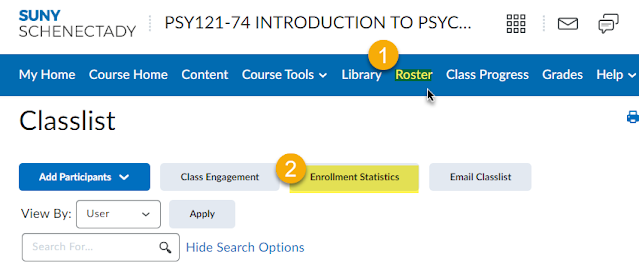
On occasion you will teach a course and have a student withdraw
from it. This is not a big deal since
there could be many reasons for this happening.
However, when the Dean needs you to report the students grades from work
prior to the withdrawal, it then becomes a big deal. How can you view their grades and participation
when this happens?
Luckily, in Brightspace, viewing the grades from a student
who has withdrawn from the class is no big deal.
There are four simple steps:
From inside your class, select the Roster option.Fortunately, at SUNY Schenectady, that is
right on the menu. (The Roster can also be found in the Course Admin under
Course Tools.)
Select the Enrollment Statistics button
Scroll down to the bottom and a list of
withdrawn students is displayed.
Click the chevron next to the student in
question to view their information.
Please note that you will need grade items for grades. Likewise, the attendance
is from the Brightspace Attendance feature. Your college may use a different
system for tracking.
These four easy steps will give you access to their grades
and information.
You started your course and you are considering revisiting your grade book - good. As you look at the Grade Center, you will see that the default is to include a “Total” and “Weighted Total” column. You will also notice that a green checkmark appears next to the “Total” column and no other column. Is this important?
The green checkmark on the left of the column represents that the column is set to appear externally from the course. In Blackboard the course selects one column to extract and collect to give the students an overall snapshot of all the student’s course grades such as when using the My Grades feature on the Institution Page.
It is important that this selected column is meaningful, otherwise students will be either be misinformed or receive cryptic misinformation about their grade. While the “Total” column is the default column that is set external, you should set the external column to reflect the students’ actual grades in a meaningful way. Similarly you might consider changing the column’s title from “Weighted Total”, to a term that makes sense to the students, such as “Your Grade So Far.”
When you do this, you supply feedback more effectively and help keep the students focused on the course. Supplying prompt informative feedback is a key part of meeting Gamson and Chickering’s 4th principle of good practice for education. Coincidentally, it also helps retain students and contributes to their success.
How do you set a column to be external?
If you wish to designate a different column as the External Grade Column, follow these steps:
Go to the Full Grade Center.
Click the action link, or chevron, for the column that is to be designated as the External Grade Column
From the drop-down menu that appears, select Set as External Grade
You are done.
Once you complete these steps, the green checkmark will be assigned to this column - confirming that it is the External Grade column.
Remember, choose your External Column wisely. This can help motivate students and keep them more engaged within the class. It only take brief moment, but selecting a meaningful column to be set as External Grade can help your students succeed.
When configuring the Grade Center it is important to know the difference between the Total and Weighted Columns.
The Total column is the total points the student collected. If you want, you can also display this in a letter grade or percentages. It would be best to have the total as points, and the second column is for the faculty’s eyes only. A lazy way of grading would be to make all tests worth a set point and then set the total to a percentage. This will give you the final grade in percentages based proportionately on the points assigned to each graded activity.
Weighted column allows for the heart of the grading to take place. It will take whatever the points are and calculate them to the grading schema that you determine.
The Weighted Column gives you a large array of options when developing a grading schema. If you scroll down you notice that you can grade based on either:
i. Categories. You can choose to calculate the category (and Blackboard will do the calculations for you. This method allows you to:
Drop the lowest grade in a category
You can also chose to use only the lowest or highest grades as well
ii. Columns (Assignments) You can select each assignment to do the job. – again, you will simply add the corresponding percentage needed.
iii. You can select a hybrid – of assignment (such as a single type activity like a Final Exam)
The Total Weight below will show you the percent to be calculated. You should be sure that this amounts to 100%.
Now you are practically done. You can select the student viewing options and submit.
When you are done with either the form of grade calculations, you should double check to make sure all the appropriate assignments are included and afterwards ensure that both categories and the correct points are affiliated with the recorded grades.
Remember, preparing in advance saves you the any trouble down the road and makes the learning expereince easier for student to succeed.
When you create an assignment or test Blackboard automatically includes the grade in the gradebook. Make sure that the “Include in Grade Center” grading calculations option is selected. This should be defaulted for assignments, but sometimes developers accidentally de-select it. This also applies to tests as well.
With Discussions Forums be sure to include the grade in the grade center
Any other activity that will be graded should also have a corresponding grade center listing as well
Including Activities in the Grade Center
Let’s look at how to format the Grade Center, which you may know as the Grade Book. In this video we will look at two parts key in providing the grade to the grade center.
1. Including an activity in the Grade Center
2. Managing the Column/activities in the Grade Center
First, let’s examine how to include an activity in the Grade Center
When you create an assignment or test, Blackboard automatically includes the grade in the grade center. However, when making an assignment, be sure that the “Include in Grade Center” grading calculations option is selected. This should be defaulted for assignments, but sometimes developers accidentally de-select it. This also applies to tests as well.
With Discussions Forums be sure to include the grade in the grade center. They are not the default, so be sure to select this grading calculation option.
Any other activity that will be graded should also have a corresponding grade center listing as well
If you imported the assignment/activity, it should be included in the Grade Center. However, it is good practice to check.
Now let's look in the Full Grade Center.
5. Go to the Grade Center
a. Each assignment is represented as a column.
To edit the assignment in the grade center, be sure to select the edit column information feature from the edit chevron of the column.
Now you can edit the column. You can select two ways to display the information – the second will be for the instructor’s eyes only.
On the bottom of the page, you will also have options to allow students to see the column.
Be sure that the settings are selected in line with how you wish to have the grade center displayed for students.
Hit submit to save. Hit Cancel and it wont matter.
b. Besides editing the column (which can allow you to assign categories) , the Chevron on each column will allow you to hide the column from students.
c. From the Manage column, you can organize the grades by selecting ‘Column Organization’
i. Here you can control where the grade center ordering of graded activities (columns) (top is left)
ii. You can also quickly check to see that each assignment has to correctly assigned category.
One key anxiety for faculty teaching traditional courses, is the integration of technology, such as Blackboard Learn, into their teaching duties. For example, the college requires you to enter the students’ grades into the grade center. Apparently students are more successful when they have access to their grades and a full understanding of what is required from them, and using Blackboard is an excellent way of giving all the students immediate access to course materials, announcements, and the grade standing.
You have put off developing the grade center, and the end of the courses is coming. Anxiety sets in.
There is no reason to worry though.
Using the grade center is not like falling down a spiral – destination unknown.
You simply need to open your Course and select the Full grade center from the menu.
Since you have a traditional course, you probably have nothing here. It is best practice to set this up early in the semester to allow students to become familiar with their grades and what is expected from them.
In Blackboard, every grade you wish to enter needs to have a column associated with it. Really, it makes sense, because you will need to enter the grade somewhere. Since the assignment did not occur Blackboard, it will not have a column automatically created. On a side note: this is one more reason why using Blackboard for assignments and tests is a good idea and makes your job easier. But you are in a panic about getting the grades entered, so let’s get back to that.
Setting up the Grade Center has three simple tasks:
First, Create Columns for each assignment.
Second Organize the Columns so that the Grade Center is intuitive and easy to navigate
Third, edit a calculated column, usually the “Weighted Column”
Let’s look into these:
First, there are columns. You can create a column by selecting the button on the farthest left on the gray bar. It is called “Create Column”.
Once you select this button, you can:
Name the column – you will need to do this and you should choose a meaningful name for students
Select the Primary display – usually Score (points) or percentage are the best option
Select a Category – this will help you with grading,
Add the amount of points. (You should note that 100 is a good rule of thumb. You do not want to mistake the number of points and add a percentage to a column with fewer points. It will create havoc with the grade calculations).
You can add “due dates” and an associated rubric, but do not have to.
With the options section, you can also choose to reveal the column to students or make it invisible.
When you are done, select “submit”
You will need to do this for every assignment you grade.
Second, go to the “Manage” button select “Column Organization”. The top rows are the ones most to the left. Organize the column order so the students can easily understand their grades. You can also ensure that the category assignments for each column is correct. Remember to hit submit to save any changes.
Third, you need to have a column that calculates a grade. Each course has a total and a weighted total column. These are calculated columns and chances are you will need only one – the weighted total column.
The Total merely aggregates all the columns.
Select the ‘Edit column’ after you select the weighted columns chevron. Now you can correctly calculate the grades in accordance with your syllabus. Using the arrows, you can either select the assignments (columns) to include or grade by category. Be sure to make sure your grading structure is isomorphic to the one laid out by the syllabus. Hit submit and you have built a gradebook.
You probably noticed that building a gradebook in Blackboard is no more difficult building one in with a Spreadsheet program.
Adding grades is even easier. Once an assignment’s column is created, you select to corresponding cell for the student, and type in the score. It is that easy.
If you have any questions, you should check out the corresponding videos about the “Weighted Total” and “Setting a column to External”. You should also make it a habit to check the learning resources you have access to as faculty. They will help you make a more effective course and contribute to your student’s success.
Good luck, but you really don’t need it.
Once you start, you will realize that it is not that difficult. Moreover, if you set up the grade center in the beginning of the course and utilize to increase communication with your students, you should notice an improvement in their performance.
Two obvious ways to grade assignments in the Grade Center are from:
Full Grade Center
Needs Grading
First you can access assignments from the Full Grade Center. Assignments needing grading will have a symbol designating that they need attention. There are two ways to enter the grade from the Full Grade Center.
You could manually grade the assignment by double clicking on the cell. This is not the best solution, because this will not be registered by Blackboard, and you may still get alerts as if the assignment was not graded.
A better solution is to click on the cell’s chevron and select the attempt. This will take you to a grading page where you can grade the assessment.
The second way to grade assignments is to click on the “Needs Grading” feature from the Grade Center menu on the left. At this point you can select by assignment or hit the “Grade All” feature.
Either way will open up a grading area that gives you tools for grading by Croc-a-doc. Using these tools, you can:
Add comments
Highlight areas
Add text
Strikeout text
And draws on the ‘virtual’ paper.
On the left you can record feedback which includes the option to attach files. This is handy if you want to include an audio of the feedback.
From here, you can submit to finish.
<Click on the above to open the Fullscreen mode. A PDF version can be downloaded there. >
Sometimes it is nice to have a few crib-notes to help when working. The following presentation has a brief overview of key aspects of Blackboard Learn. The most common faculty and developer items are covered.
Specifically, it covers the common elements of course creation (content, assessments, and discussions), tools (for communications), and the Grade Center (creating columns, categories, organization, and weighted columns).
Feel free to select the arrow to download the presentation in pdf format. Also, selecting the full screen is helpful.
Grading in Blackboard is probably easier than you think. Often it is as easy as selecting a button stating “Grading Discussion Forum” or “Grading Assignment”. If you follow these simple steps you can grade or re-visit grades to edit or change them.
1. Make sure when editing the assignment (et al.) that you want graded, that you have the check box ensuring that it will be included in the Grade Center is selected.
2. Be sure there is a submission to be Graded
3. Either Grade it from the submission area or the Grade Center
a. Within the area with the submission:
i. Select the button on the dark row that states “Grade” ii. You will see a list of students and the ones with submissions will be indicated.
iii. Select the Grade Box
iv. Add comments and grade
v. Submit
b. Within the Grade Center you have several ways of viewing submissions that work and the Full Grade Center allow you to view and edit previously graded submissions. The Grade Center options include:
• “Needs Grading”,
• “Full Grade Center”
• ‘Assignments”
• “Tests”
c. Select one of these.
d. Find and select the column and specific assignment you wish to grade.
e. Select the drop down editing arrow and select “View Grade Details”
i. You can select “Attempts” to see attempts as well as grade or re-edit the grade.
ii. You can enter a grade.